

How Long Does Macos Monterey Take
macOS 12 Monterey is the name of Apple'south latest operating system, an evolution of the current Big Sur platform that offers new features and tweaks to some of the Cupertino giant'due south virtually popular apps and services. Apple tree released macOS 12 Monterey on Monday, Oct 25.
In this guide, we're going to walk you through the steps required to make clean install macOS Monterey, including backing upwards your existing files and creating a bootable USB stick that will be used to perform the installation.
Why perform a make clean install of macOS Monterey?
When nosotros talk nigh a "make clean install" of macOS Monterey, nosotros mean erasing the main disk of all its files and so installing the new operating organisation on the freshly wiped drive.
Typically, when y'all're offered an operating system upgrade from the Apple App Store, you're encouraged to only download the new version and to overwrite your existing setup, without wiping the entire disk and erasing your data.
In that location's absolutely naught wrong with this "standard" method of installation, only wiping the disk entirely and performing a true "make clean install" will remove whatever potential bug, from outdated or 3rd-party software. Information technology will besides remove any transient files and incorrect settings in your Library binder — things that could potentially cause issues days, weeks, and months down the road.
Volition you risk losing whatever of your files?
Does the idea of wiping your current operating system make full you with dread? Well, with our footstep-past-step guide, you needn't worry about losing any of your precious files, and we'll assist y'all to create several backup options just in instance things don't piece of work out according to programme.
Convinced? Great! Let's swoop correct in…
Is your Mac compatible?
macOS Monterey is the beginning major release from Apple tree that will contain features that just work with the new Apple M1 fries found in the latest MacBook Air, MacBook Pro, and Mac mini — and a further tier of features will only work on the more than powerful 16 GB versions of those devices.
Yous tin still clean install macOS Monterey on an older Intel car, just it's worth noting that most computers over 5-vi years sometime probably won't be compatible.
Step one: Fill-in your existing installation
As you're going to completely clean install macOS Monterey, your calculator's bulldoze and all of the files stored on it volition exist completely wiped and replaced past the new operating system. As yous tin can imagine, that ways that before attempting to apply your USB installer that you'll want to ensure that:
- All of your files and folders can be easily added back to your new install.
- You lot accept a complete fill-in of your old installation in case something goes incorrect.
Start past making a Time Machine fill-in
When you lot clean install macOS, ideally, you should e'er brand fill-in copies of your Mac just in case something goes incorrect. In fact, regardless of whether you're upgrading your operating system or not, it's still prudent to keep your arrangement backed up at all times. Luckily, Apple's built-in Fourth dimension Machine app makes this process extremely simple:
- Plug in a USB hard drive with enough space for your backup.
- Head to the settings panel.
- Click the Time Machine icon.
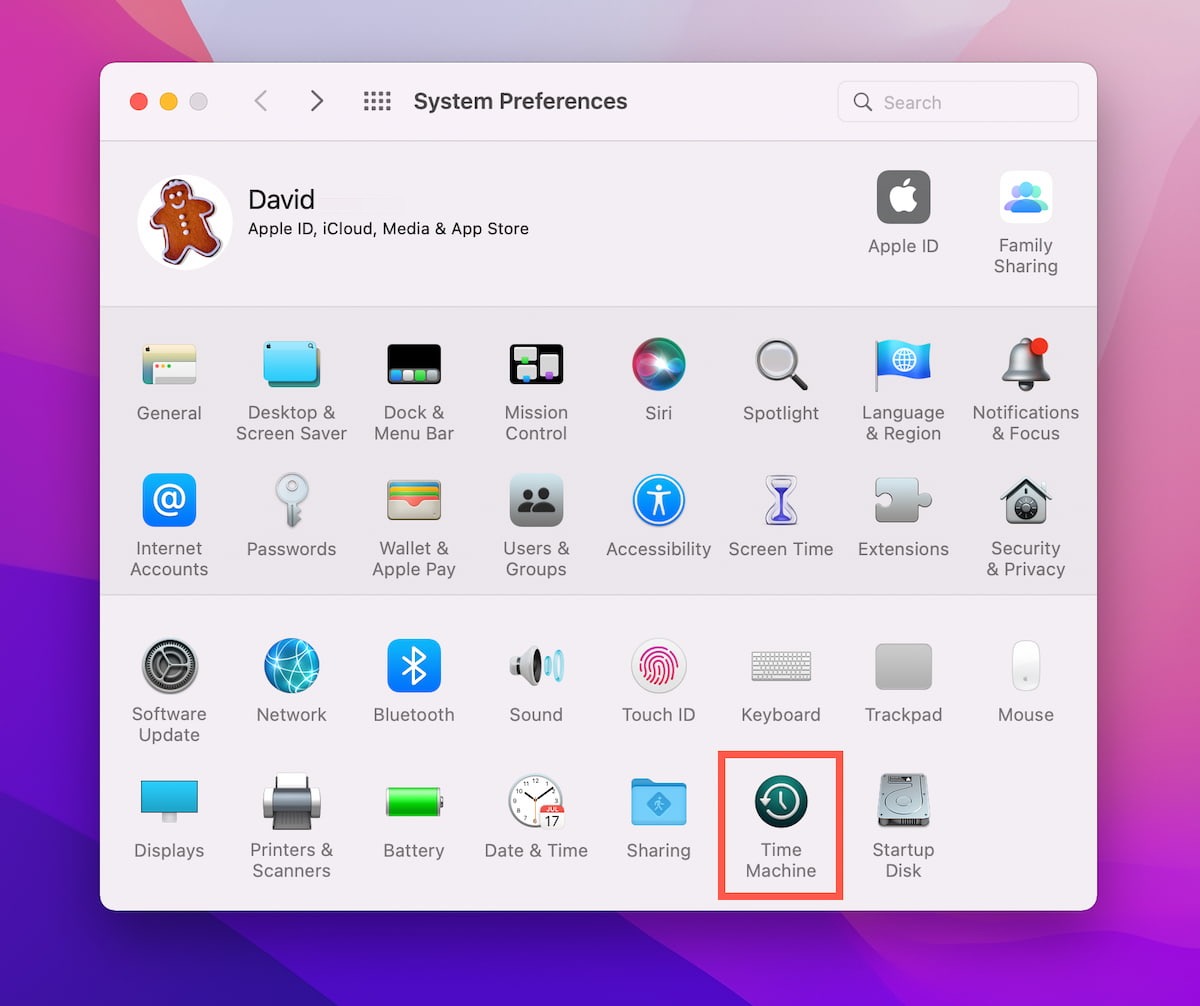
- Click Select Deejay.
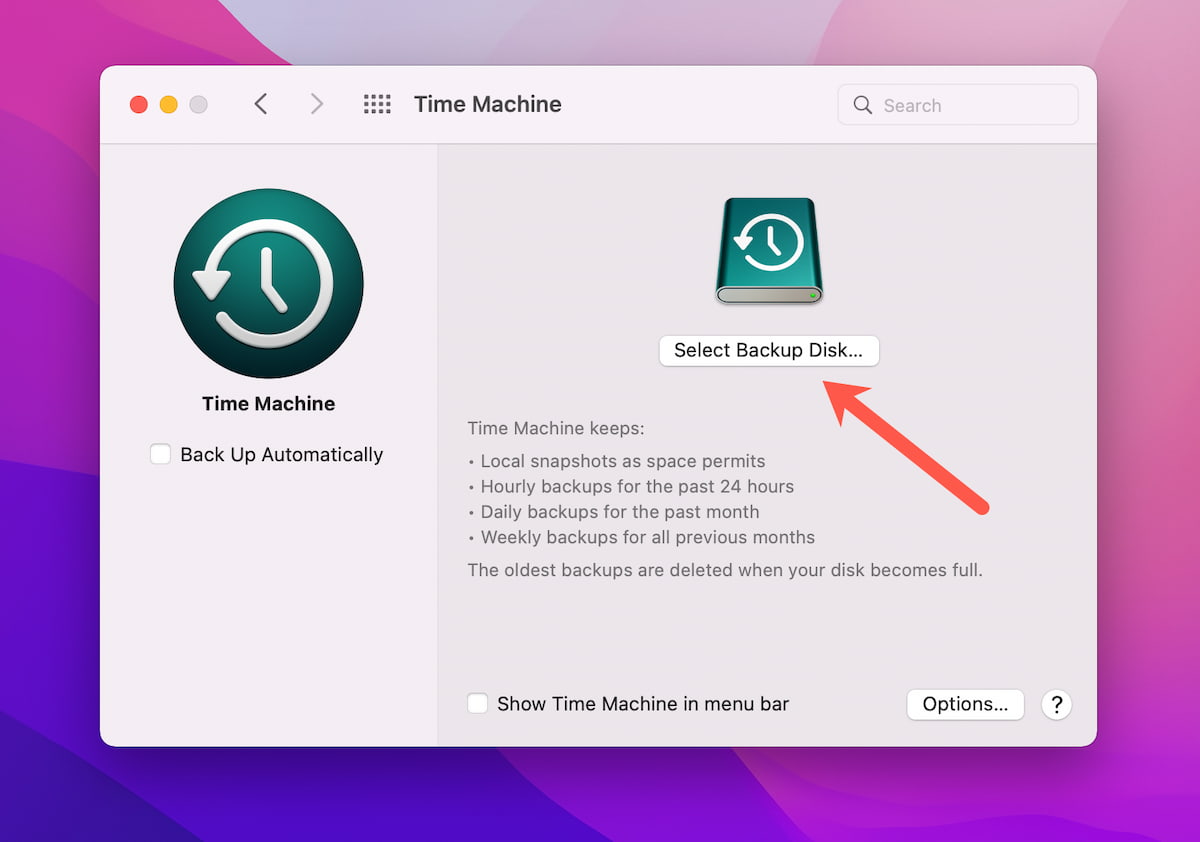
- Select the disk you lot'd like to use for backups.
That'south all there is to it. Fourth dimension Machine works silently in the groundwork, storing snapshots of your organisation every hour for 24 hours, then daily backups for one month, and, finally, weekly backups for all previous months. One time the disk gets full, Time Machine will gratis up space past overwriting the oldest copies start.
Once y'all take Time Machine up and running, you can click the Fourth dimension Car icon in the superlative correct of the carte bar, and so click "support now" to ensure you have a contempo backup of your computer.
Apply Disk Drill to brand an image of your entire disk
Disk Drill is a really handy (and free) app that allows you lot to recover lost or deleted information. The app also has a useful installer tool for making bootable macOS USB sticks, and it can even back up your entire disk to a .dmg image file.
Read likewise: Recover Lost Files After a macOS Monterey Update
Should something go wrong with your macOS Monterey install, y'all'll exist able to quickly and simply restore your old setup from this .dmg file. Here'due south how to create the backup file:
- Download, install and open up the Disk Drill app.
- Click "Byte-to-byte Backup" from the "Actress Tools" menu in the left column.
- You'll at present be shown a list of available disks that can exist backed up into a .dmg file. Select your chief organisation disk and click the "Create fill-in" button.
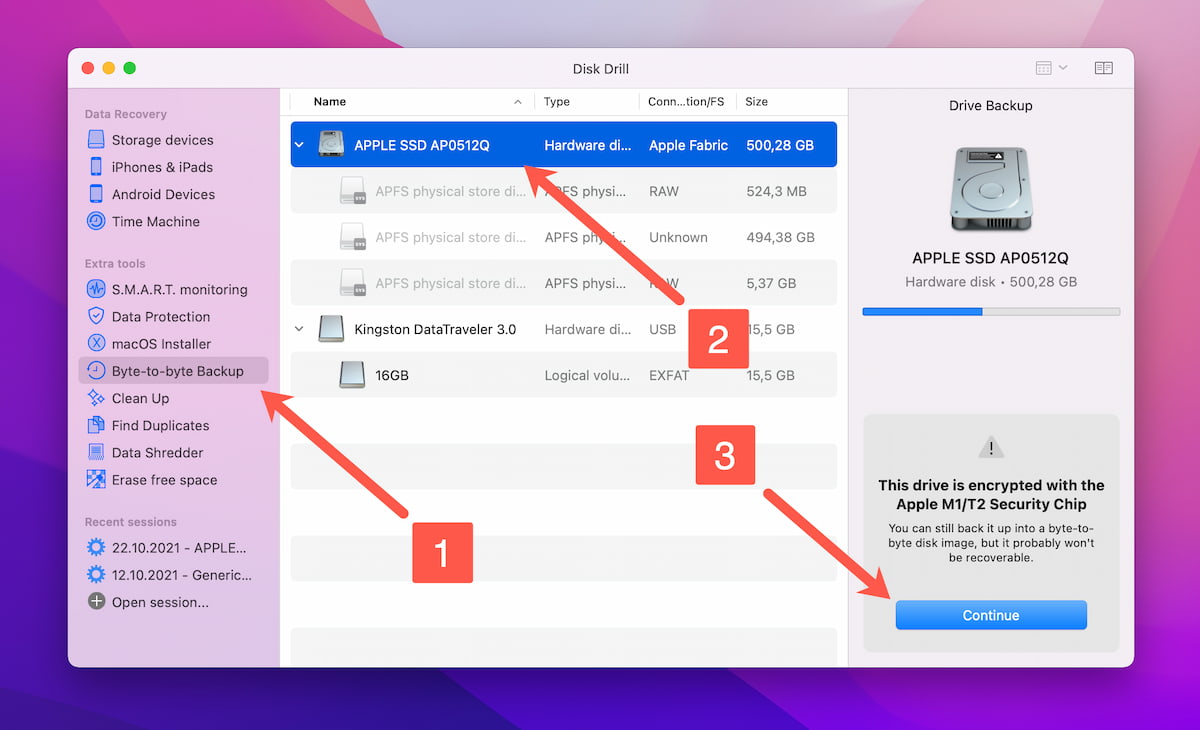
- Once you lot've named your file and selected a location to safely store the fill-in, clicking "relieve" volition begin the creation process.
- In one case your file has been created successfully, you'll be fix to clean install macOS Monterey.
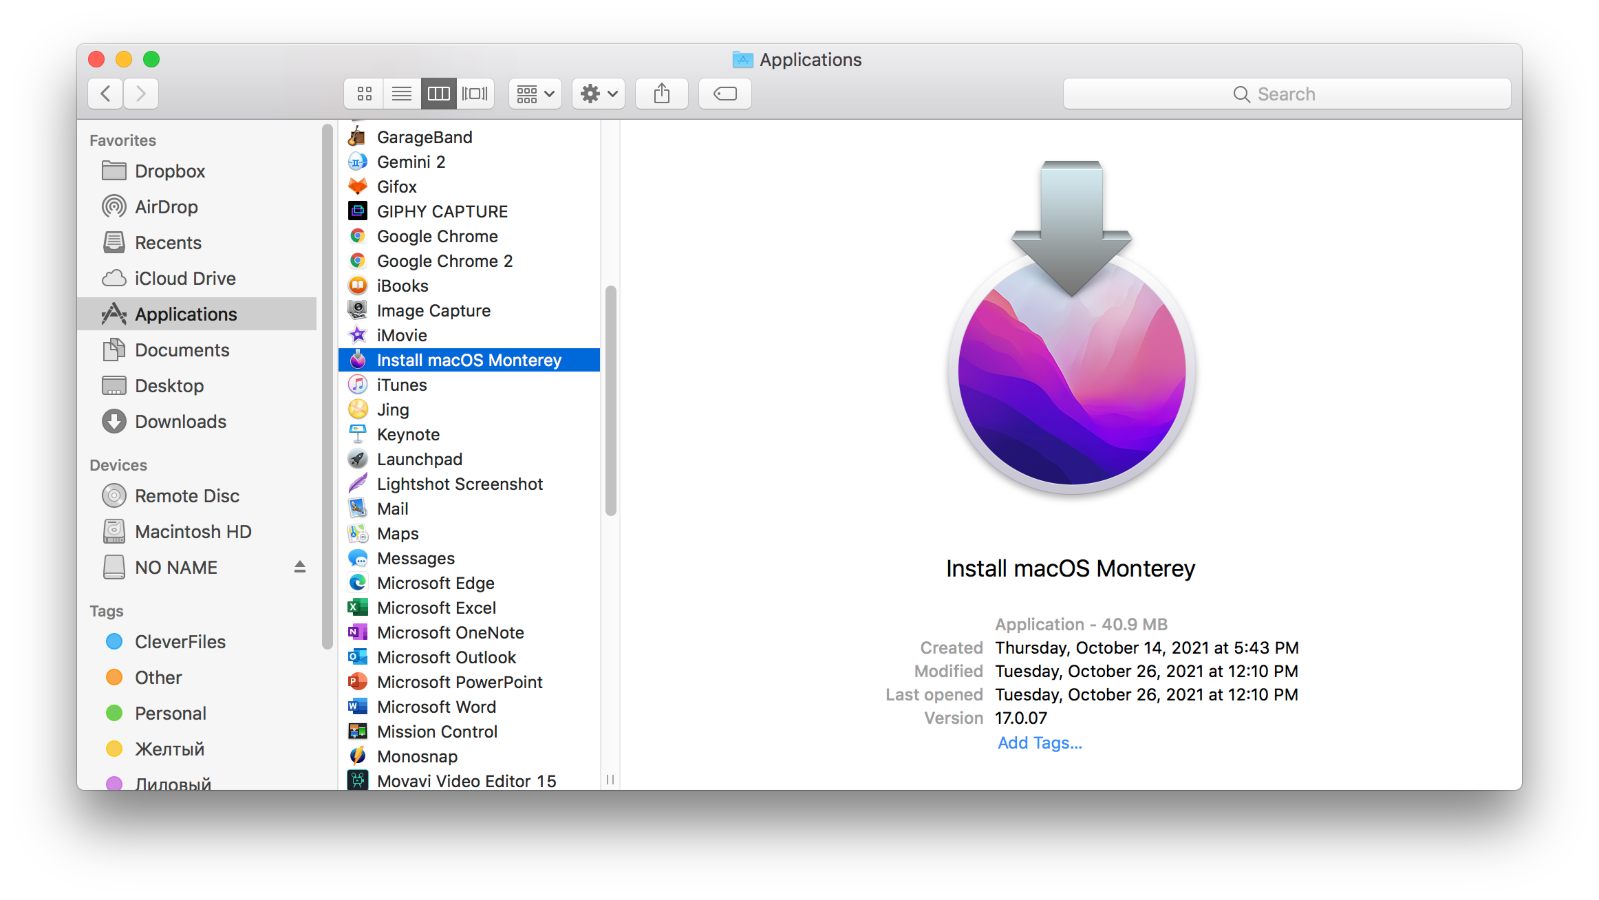
Step 2: Download the macOS Monterey Installer
You can download the macOS Monterey installer from the App Store:
- Launch the App Store.
- Click the search bar, type in "macOS Monterey," and hit Render.
- Click macOS Monterey in the search results.
- Click the Get push button to download the macOS Monterey installer.
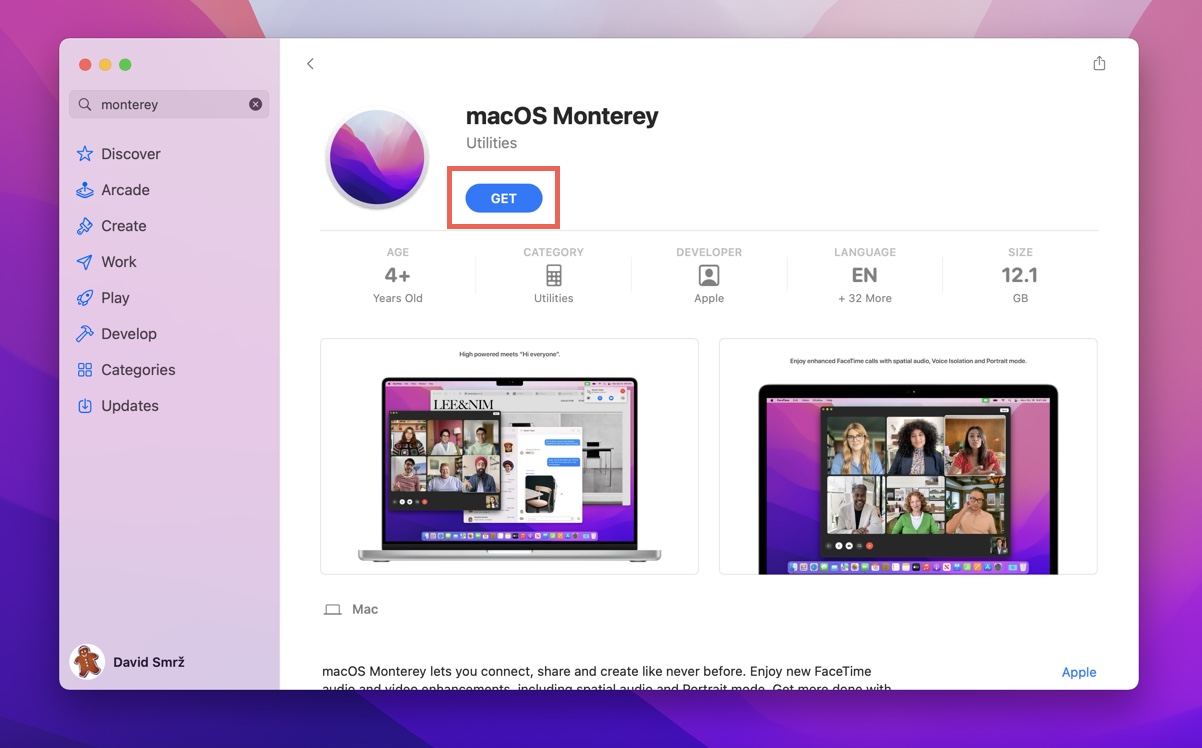
- Wait for the download to stop.
The macOS Monterey installer is effectually 12 GB large, and so it may take a while for information technology to finish downloading, depending on the speed of your internet connection.
Stride 3: Format a USB Flash Drive for macOS Monterey [Optional]
At present that yous take a copy of the macOS Monterey Installer sitting in your Applications folder, information technology's time to make a bootable USB stick. Yous'll demand to find one with at to the lowest degree 16 GB of space, every bit the macOS Monterey Installer tips the scales at around 12-14 GB.
Here's what you'll need to practise to prepare the USB stick:
- Plugin the USB stick.
- If you lot've used the stick before, cheque for any of import files that you might take forgotten.
- Open the Disk Utility (institute in the /Applications/Utilities/ folder).
- Select your USB stick and click the "Erase" button (from the listing of icons at the summit of the window).
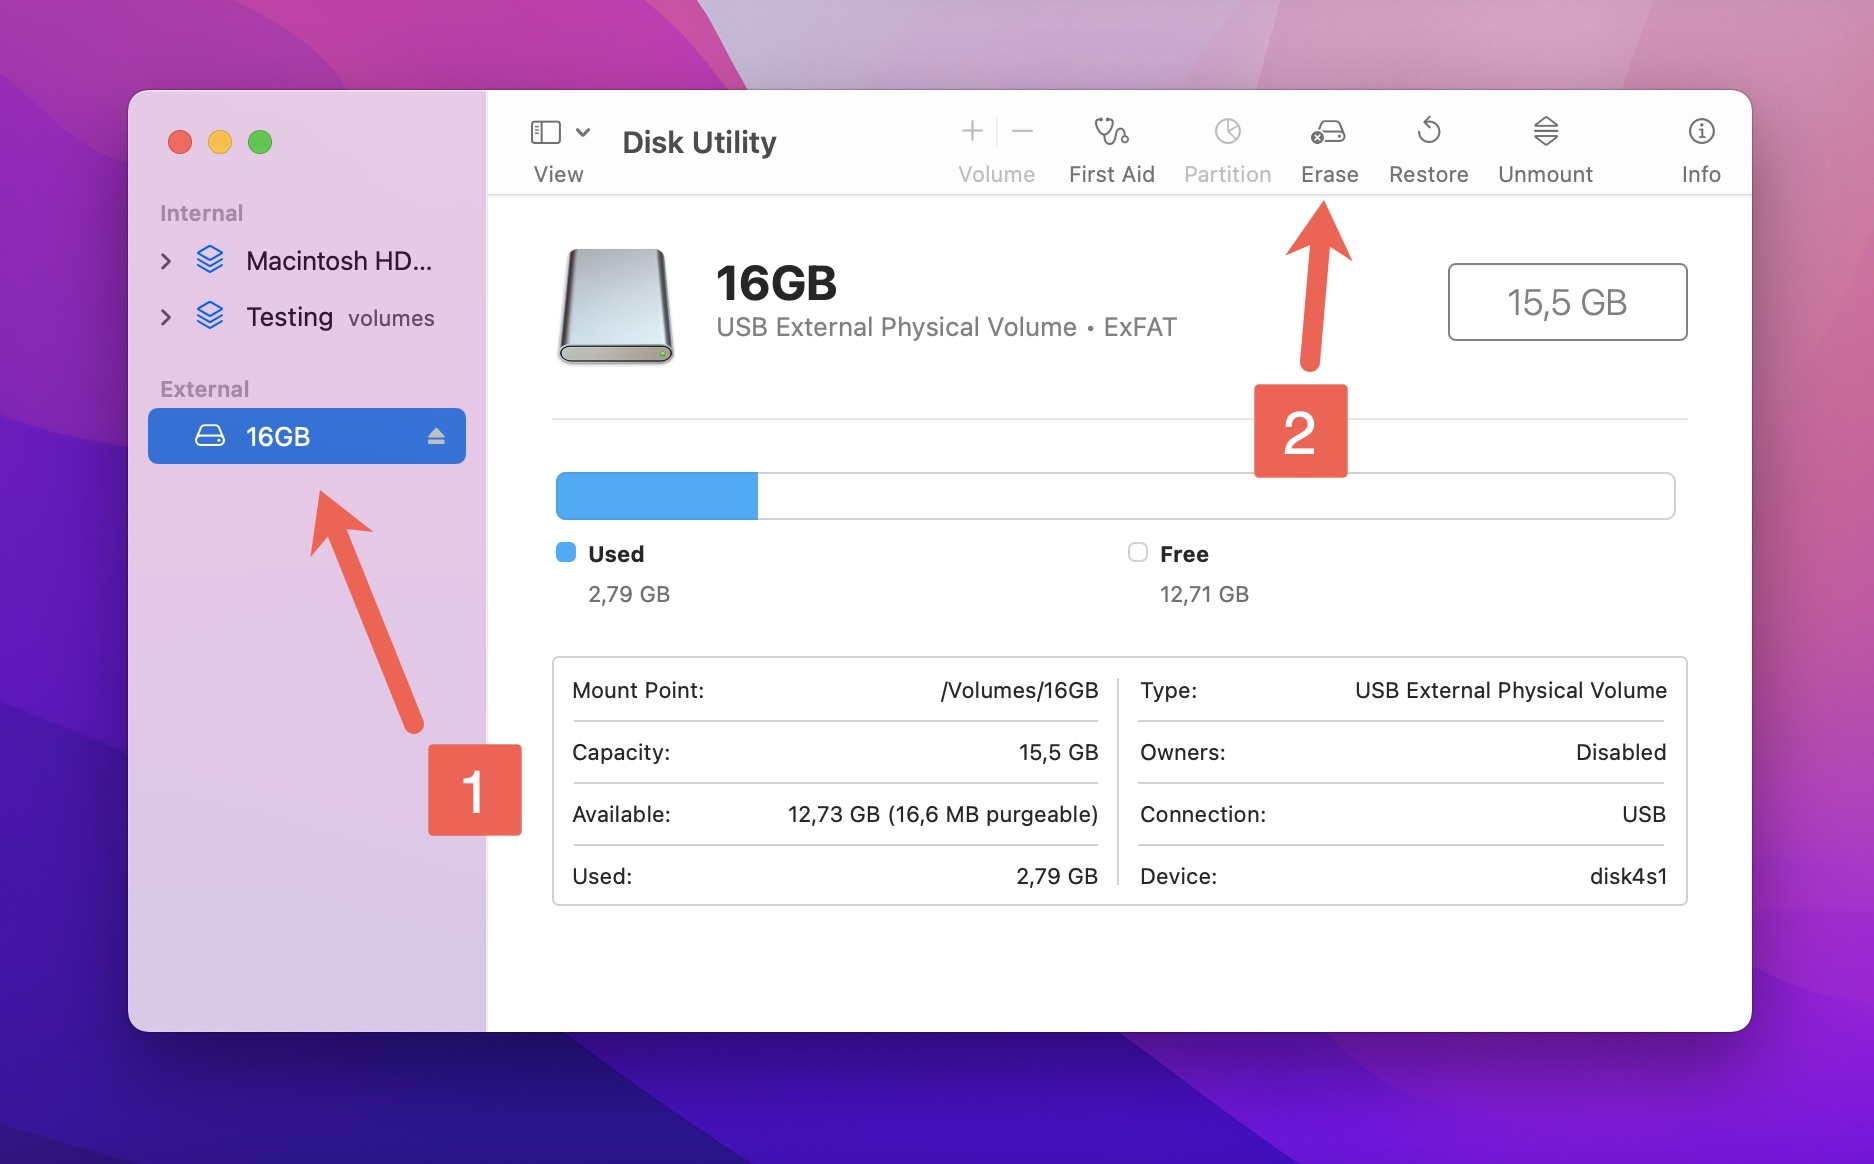
- Brand certain "Mac OS Extended (Journaled)" is selected.
- Name your stick "MontereyUSB" or something else that's easy to place.
- Click the "Erase" button.

Step 4: Install macOS 12 Monterey onto your USB Drive
In one case your USB drive is freshly formatted, it's time to add the macOS Monterey installer that yous downloaded earlier. This requires typing a few lines into the Terminal application — but don't worry, it'due south really simple!
- Open up the Concluding (found in the /Applications/Utilities/ binder).
- Paste the following command into the terminal window:
sudo /Applications/Install\ macOS\ Monterey.app/Contents/Resources/createinstallmedia --volume /Volumes/YOURUSBDRIVE --nointeraction
- Supercede YOURUSBDRIVE with the actual name of your USB drive.
- Finally, hit the enter fundamental and blazon your master admin account password.
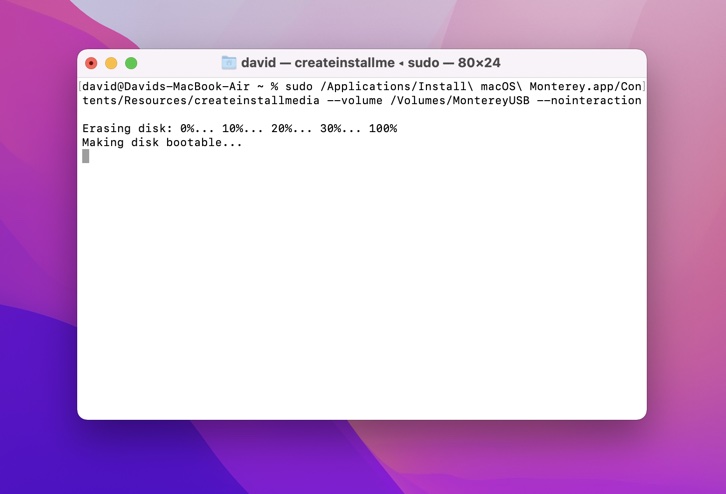
That'southward it! Yous'll be asked if you want to proceed with the installation, and if y'all agree, you'll see a percentage indicator in the Terminal window indicating the progress of the re-create.
Subsequently that'southward completed, y'all'll exist the proud possessor of a bootable macOS Monterey USB stick!
Culling method: Disk Drill
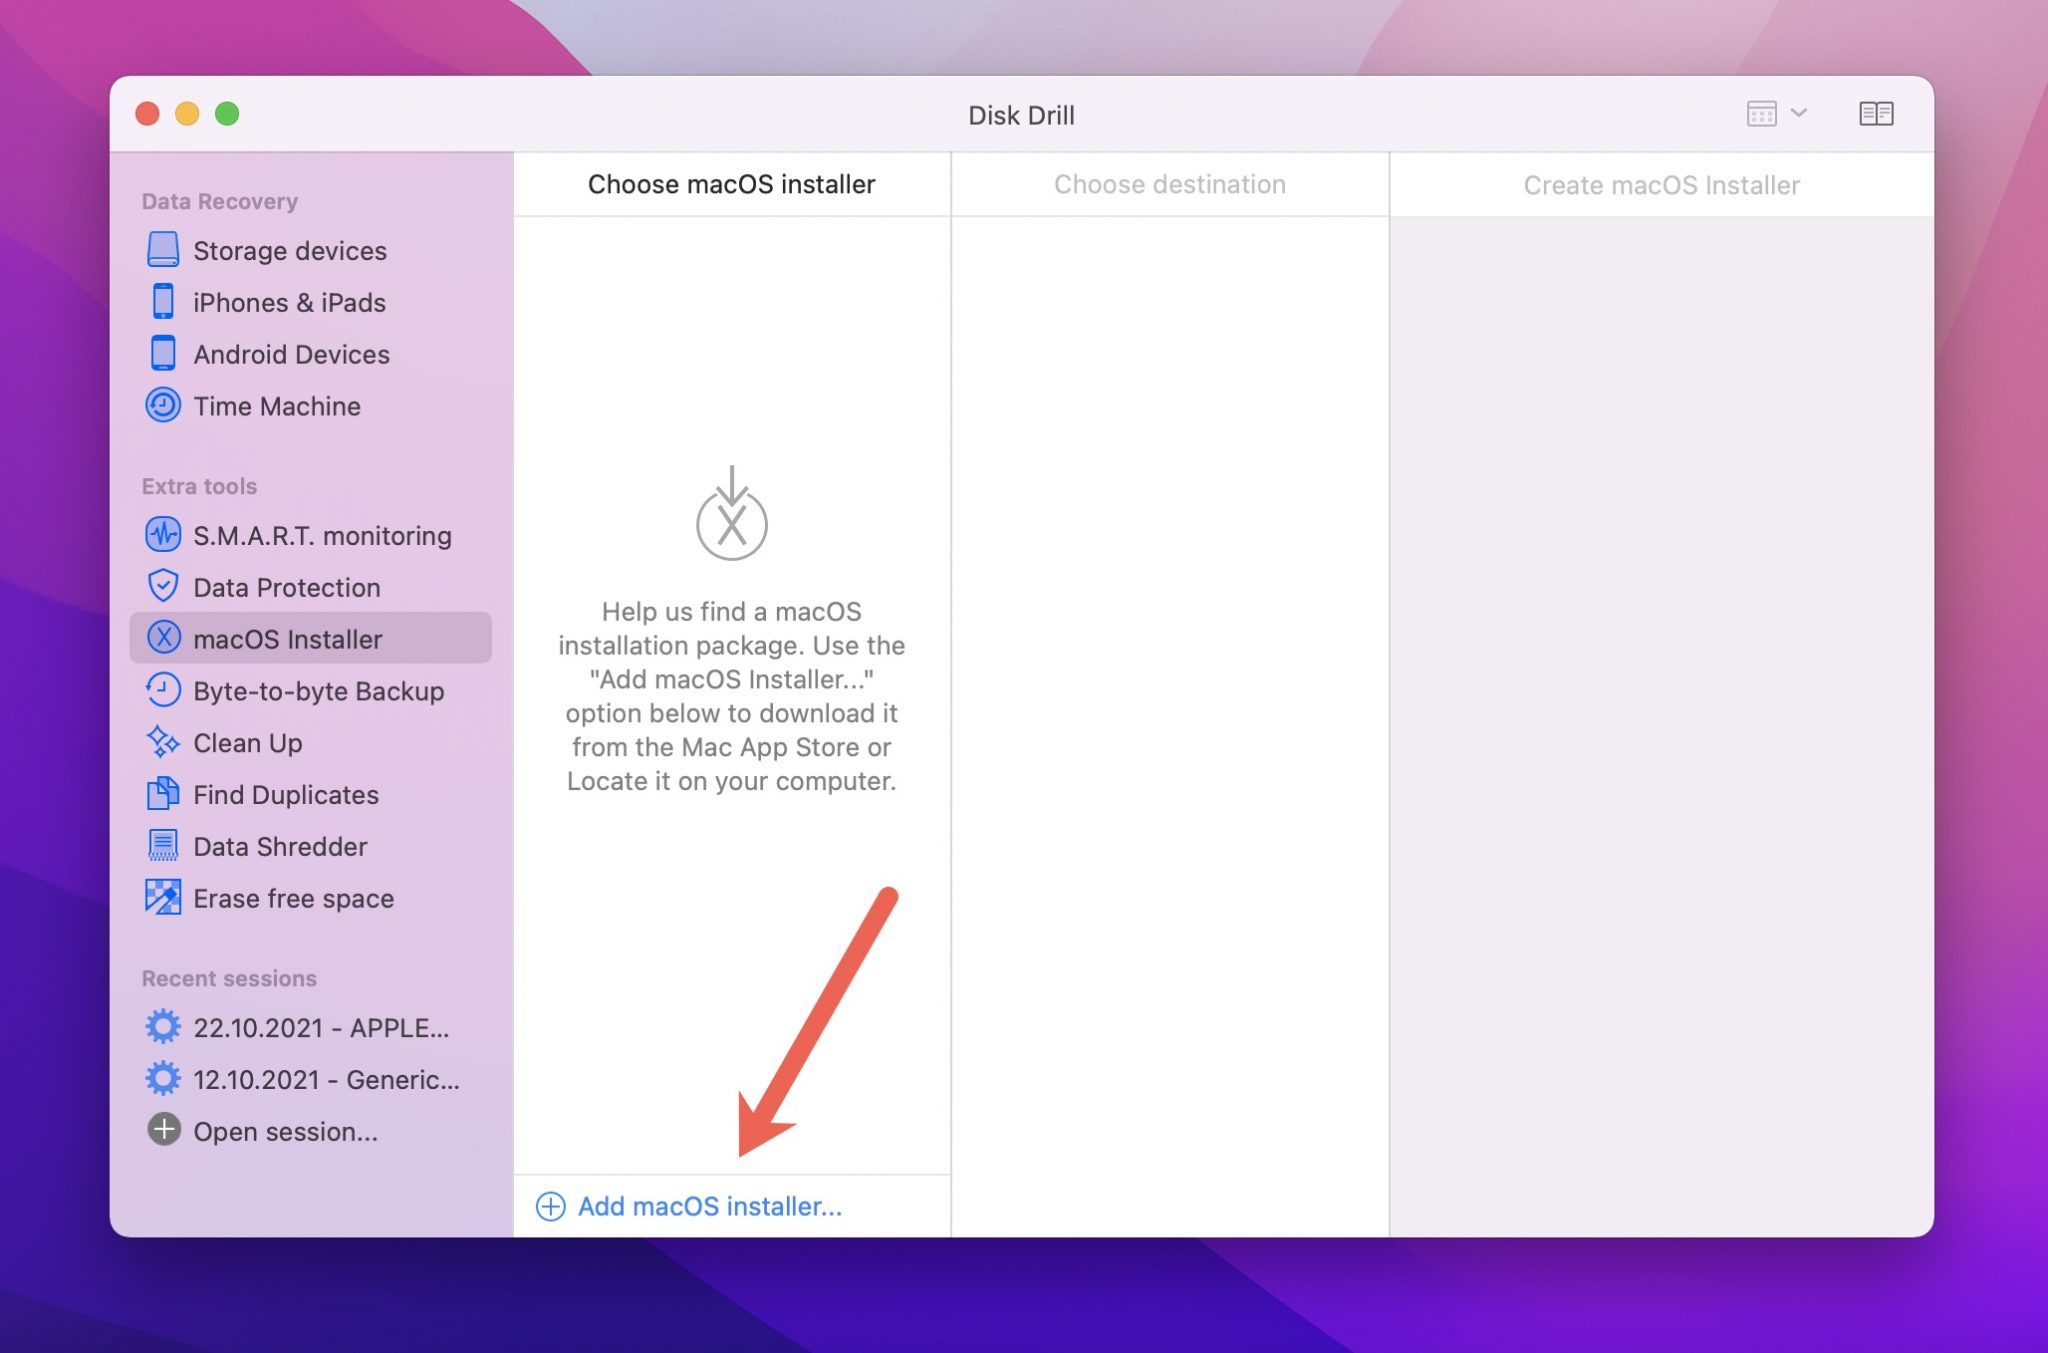
If you're a little reluctant to burn down up the Last, in that location is another method that you can use to install macOS Monterey in a few simple clicks: Disk Drill.
- Launch Disk Drill and select "macOS Installer" from the left pane.
- Select "Install macOS Monterey" from the list of available options.
- If you tin't see the correct file, there's an choice to manually add together information technology at the bottom of the window.
- Adjacent upward, select the USB stick you'd similar to use.
- Click the "Create macOS Installer" button at the bottom correct of the window, but retrieve that ALL data on the selected USB stick will be erased.
As you lot tin can meet, the Deejay Drill app makes the entire procedure extremely fast and simple, and information technology'southward peculiarly handy to have around as we approach the next stage of the install procedure.
Step 5: Clean install macOS Monterey
To begin to clean install macOS Monterey, you'll need to shut downwardly your motorcar, then boot again from the USB stick that you created, rather than the main drive.
Historically, this process was equally unproblematic as starting your machine whilst holding downwardly the Option key and selecting the correct deejay. Today, modern Macs require an extra security setting to be inverse to allow the motorcar to boot using other media.
This process is really simple, merely it does vary slightly depending on the age of your machine.
one. Enter recovery style
To alter your security settings, y'all'll first demand to boot your machine in recovery style:
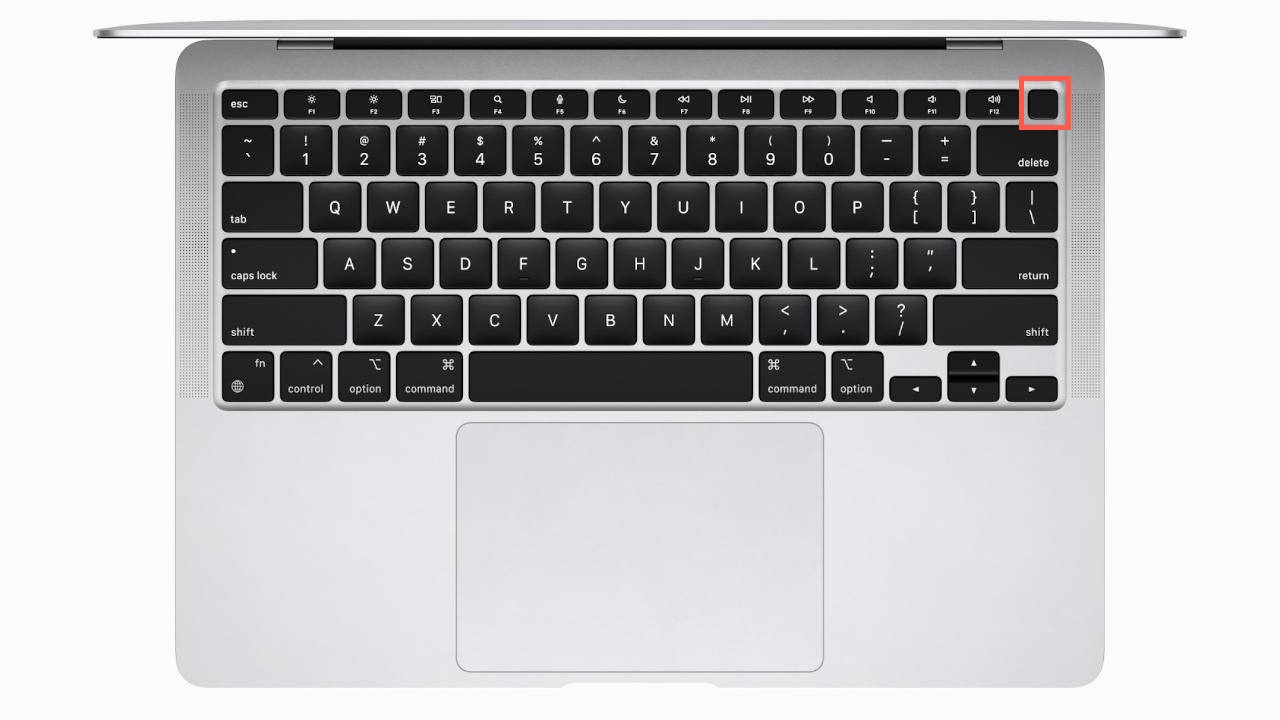
- If yous accept a new M1-powered automobile, yous tin enter recovery mode by turning on your automobile in the usual way, but keeping the ability button held downwardly until you run across the Startup Options screen.
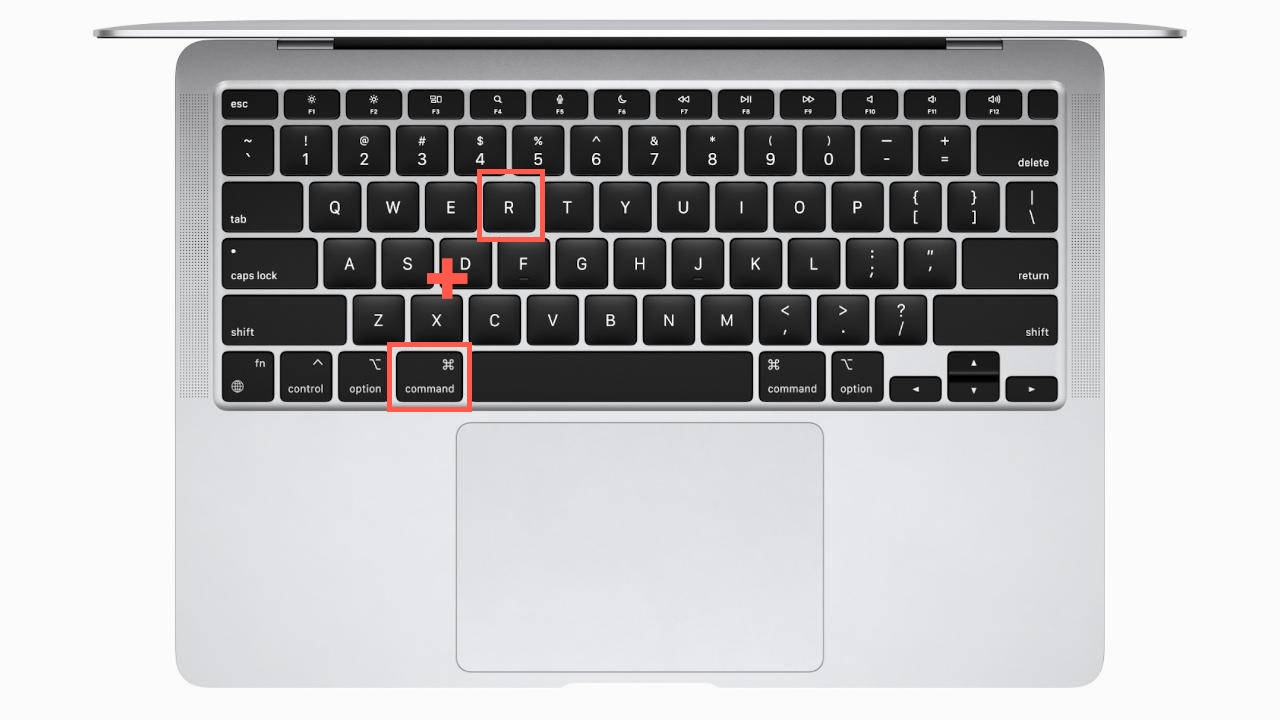
- For all other compatible Macs, y'all tin enter recovery mode past holding down Command-R before the Apple logo appears and the startup chime sounds.
2. Update your startup security settings
In one case your Mac is in recovery manner, you tin update your security settings to let the motorcar to kicking from a USB stick. This process is also slightly unlike depending on the age of your machine:
- If you have an M1 Mac, click on the gear icon (Options), then click Continue. One time you see the main recovery screen, click on Utilities in the tiptop menu bar. Next, go to Utilities > Startup Security Utility. Select your main drive and and then click the Security Policy push. In the next window, select Reduced Security. You're now ready to shut down your Mac.
- For Intel Macs with the T2 chip, you lot need to navigate to the aforementioned Utilities > Startup Security Utility screen in one case in recovery mode. Press the push Enter macOS countersign, and enter your password again when the StartUp Security Utility window appears. Under Secure boot, select Medium security. Select Let booting external media under the Allowed boot media. Then, close the window by clicking the crimson X icon. but after being prompted for a countersign, you'll need to select Medium Security, followed past "Let booting external media". Once the window is closed, the settings will exist applied and stored. You can at present shut downwardly your Mac.
- For older Intel Macs without the T2 chip, click Utilities and select Startup Security Utility located at the tiptop bar card. Bank check if the option "Firmware Countersign Protection" is in the off state. If it is on, plow off password protection.
3. Install macOS Monterey
After all the hard work, you're now finally set to brainstorm the actual make clean installation of macOS Monterey. One time again, you need to follow slightly different instructions depending on if you accept a Mac with Apple tree Silicone or Intel.
Mac with Apple Silicone (M1, M1 Pro, M1 Max)
- Make sure the USB bulldoze with macOS Monterey is continued to your Mac.
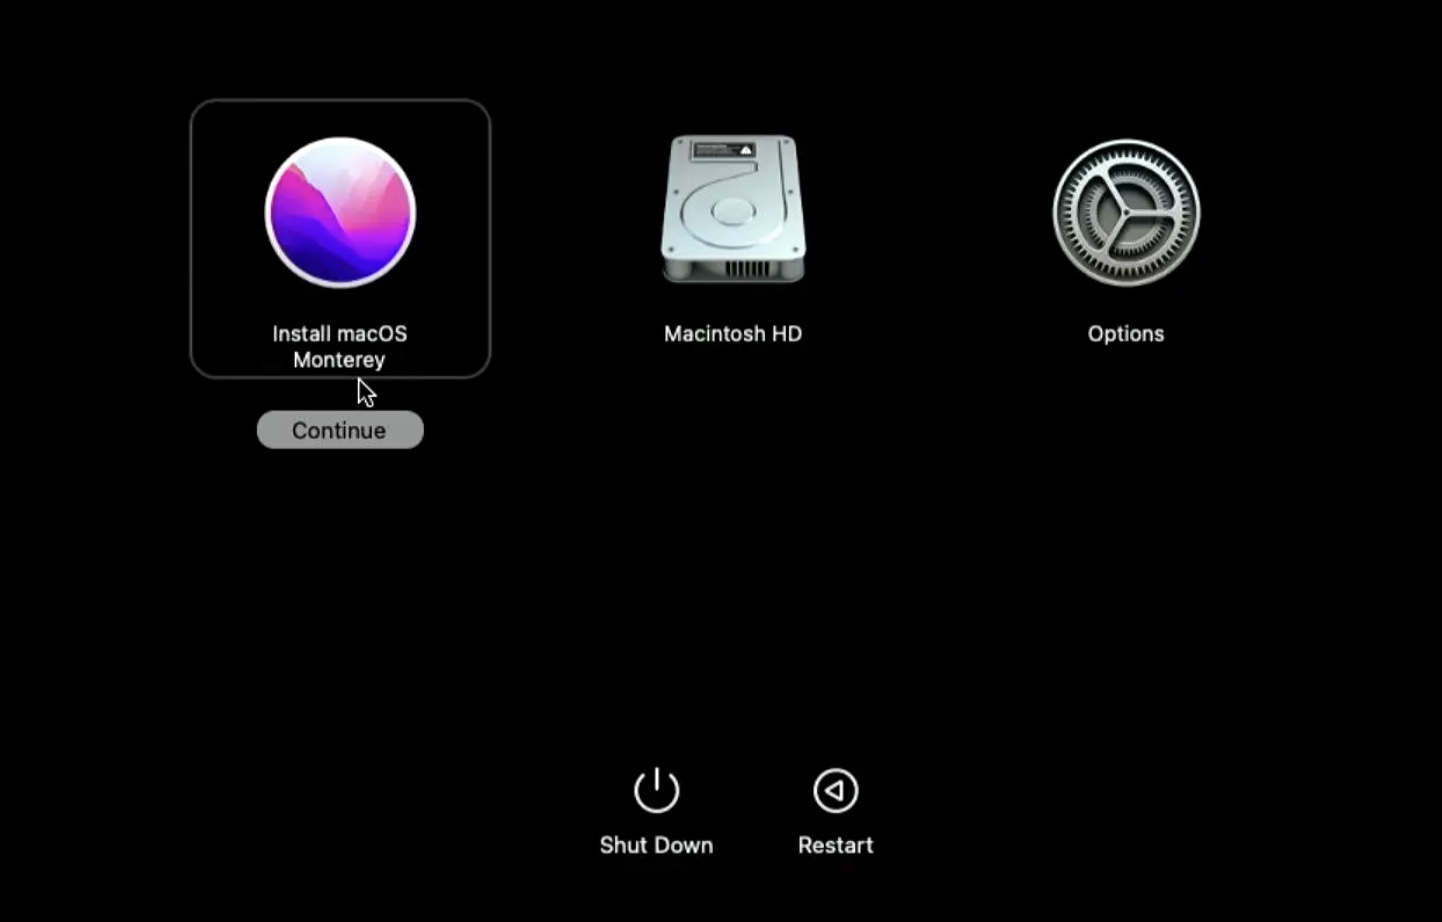
- Plough off your Mac. Press and hold the power push button until you see the Startup Options window.
- Select Install macOS Monterey and click Continue.
- You lot volition be presented with the macOS installer window. Close it by pressing Install macOS Monterey > Quit Install macOS.
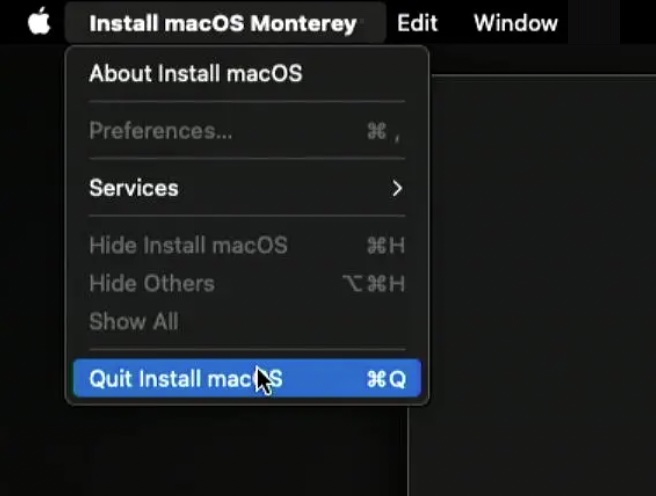
- Click Quit to confirm. We need to do this to enter Disk Utility to erase your principal system bulldoze.
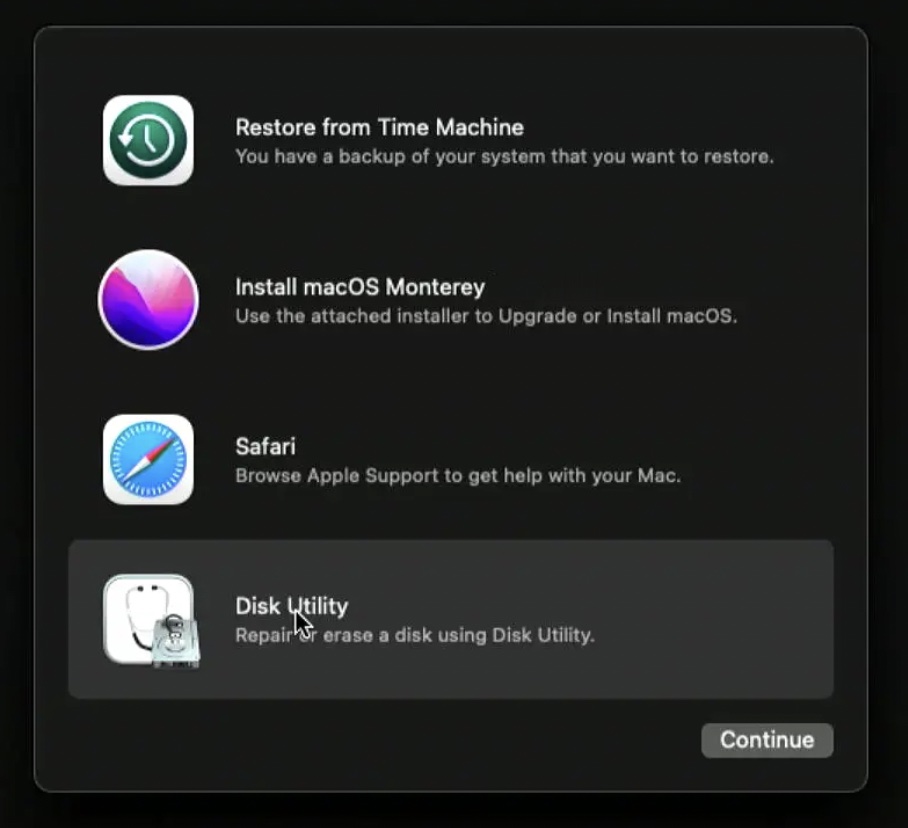
- Select Deejay Utility from the list of available options.
- Click the View button, select Show all devices, so select your internal drive.
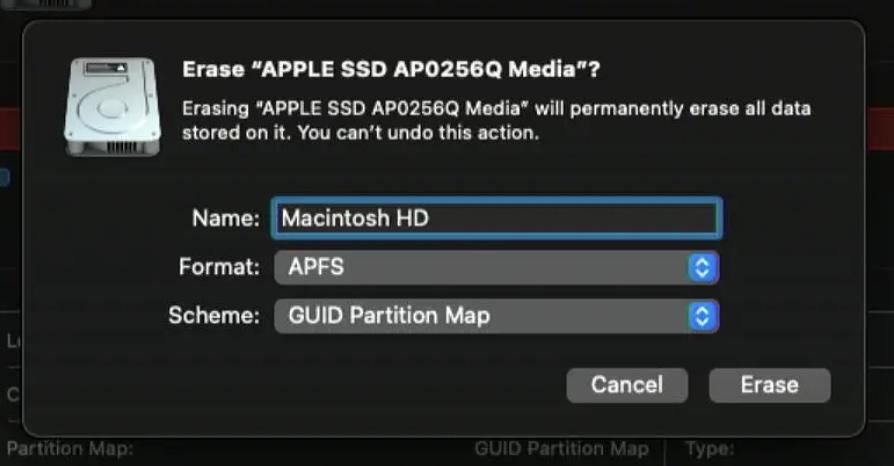
- Click Erase and choose APFS. Ostend.
- Your Mac will automatically restart and bring you to the activation screen. You lot need to have an internet connection to finish this process.
- Click Exit to Recovery Utilities.

- Close down your Mac and press and concur the power button until you see the Startup Options window again,
- Select Install macOS Monterey and click Continue.
- Install macOS Monterey by following the installation sorcerer.

Macs with Intel processors (both with and without the T2 chip)
- Make sure the USB drive with macOS Monterey is connected to your Mac.
- Plow off your Mac. First your Mac while holding down the Selection key.
- Choose the Install macOS Monterey boot selection.
- Then, enter your account countersign to access the macOS recovery carte.
- Choose Disk Utility.
- Click the view push, and select Show All Devices.
- Select your internal drive.
- Click Erase. Make sure to continue the format as APFS. Confirm.
- Your current macOS is now deleted. Shut Deejay Utility to go dorsum to the Recovery window.
- Click Install macOS Monterey and continue by post-obit the installation wizard.
The installation volition begin. Don't exist surprised if your Mac restarts a couple of times during the installation process. Subsequently virtually 30 minutes, the clean installation of macOS Monterey should be finished, and you can enjoy your pristine operating system.
Determination
If you want to restore your Mac to its original country when you lot first started using it, a clean installation of the operating arrangement is the but option. Without running a proper make clean install, y'all gamble keeping old information and application settings, which could elevate downward the functioning of some applications and the operating arrangement as a whole. As long as you take the necessary precautions to back up all personal files beforehand, this is a rubber procedure that can help you restore some of the performance your Mac has lost over time.
FAQ
To perform a clean install of macOS Monterey, follow these steps:
- Backup your current installation and whatsoever personal files
- Download the official macOS Monterey installer
- Format a USB flash drive for macOS Monterey
- Load the macOS Monterey installation files onto your USB drive
- Install the operating system from the drive
One time y'all're done with the reinstallation and no longer need the installer, it's safe to delete it. However, it's a good thought to go along the USB stick y'all've prepared in case you lot need to reinstall the operating system in an emergency.
If you want to downgrade to a previous version of macOS, similar Large Sur from Monterey, you'll have to make sure to specifically download that version from the official repository, and then follow the in a higher place steps for installing from a flash drive.
- Fill-in your current installation and whatsoever personal files
- Download the official macOS Big Sur installer
- Format a USB wink drive for macOS Big Sur
- Load the macOS Big Sur installation files onto your USB bulldoze
- Install the operating organization from the drive
![]()
David Morelo
David Morelo is a professional person content writer in the applied science niche, covering everything from consumer products to emerging technologies and their cantankerous-industry awarding. His interest in technology started at an ...
Read full bio
![]()
This article has been approved by Brett Johnson, Data Recovery Engineer at ACE Data Recovery. Brett has a Available'south Caste in Computer Systems and Network, 12 years of experience.
Source: https://www.cleverfiles.com/howto/clean-install-macos-monterey.html
0 Response to "How Long Does Macos Monterey Take"
Post a Comment